Top Thrill Dragster - A Technical Introduction
Dave Althoff, Jr.
Cedar Point's new ride is not just the tallest and fastest roller coaster ever built. It also features a number of technological innovations that make such a tall, fast, high-impact ride possible. These innovations aren't necessary for a 420-foot-tall 120-mile-per-hour coaster, but they don't hurt, either.
Hydraulics play a key role in the operation of the Top Thrill Dragster. So for starters, here's a quick primer on hydraulic systems.
Basic Hydraulics
Hydraulic systems operate on a simple principle: Liquids cannot be compressed. This means that if you fill a tube with liquid and put a plug in each end, pushing on one plug will cause the plug at the other end to move an equal distance. So hydraulic fluid, usually some kind of oil (automotive transmission fluid is frequently used in amusement rides) can be used to move force from one place to another. Most often, the fluid is used to move cylinders around, to initiate linear motion, but it can also be used to spin a rotary motor. In any hydraulic system you need a supply of fluid, a supply of fluid pressure, and work to be done. To do this requires pumps, reservoirs, cylinders, motors, valves, and an assortment of other special parts.
Hydraulic Lap Bars
A simple example can be found on Top Thrill Dragster's train, right above the riders' feet. Each lap bar on the train is attached to two hydraulic systems. Well, here's a schematic diagram ...
Figure 1
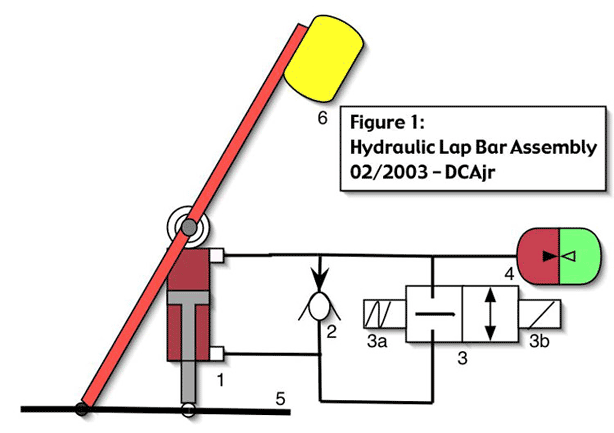
The lap bar (6) is hinged from the floor (5), as are the two hydraulic cylinders (1). There are two independent but identical systems at work here, for simplicity let's look at only one of the two systems. The cylinder (1) is attached to the floor (5), and to the lap bar (6). The cylinder is completely filled with hydraulic fluid (red), and has a piston in the middle (grey). Fittings at both ends of the cylinder allow fluid to flow. The two ends of the cylinder are plumbed together through a check-valve (2). A check valve is simply a passive valve that allows fluid to flow in only one direction. In this case, it allows fluid to flow freely from the closed end of the cylinder to the rod end of the cylinder, as shown by the arrow. This means that the rod can be shortened unconditionally, which corresponds with lowering the lap bar (6).
There is a minor problem with this arrangement. The rod end of the cylinder (1) is smaller than the closed end, because part of the cylinder volume is taken up by the piston rod. This means that when the cylinder (1) is pushed together, more fluid will come out of the closed end than will fit into the rod end. To handle this excess fluid, another line diverts the excess fluid to a little bottle (4) attached to the side of the cylinder (1), but schematically shown separate. This bottle contains a small Nitrogen-filled balloon (green). When the rider pulls back on the lap bar (6), the cylinder (1) is pushed together, forcing fluid out of the closed end, through the check valve (2) and into the rod end. Because not all of the fluid will fit into the rod end of the cylinder, and because fluids cannot be compressed, some of the fluid is forced instead into the bottle (4). Fluids cannot be compressed, but gasses can. As the fluid flows into the bottle (4), it squeezes on the Nitrogen gas filled balloon. That balloon allows the fluid volume to change without allowing any air into the system. Also, squeezing the balloon increases the gas pressure. Nitrogen is generally used because it is an inert gas and won't explode under high pressure. The bottle in this case is known as a "bladder accumulator". It 'accumulates' hydraulic fluid and stores it under pressure, the pressure in this case supplied by the gas-filled balloon.
There is one more thing missing from the lap bar system. In parallel with the check valve (2) is a second valve (3) called a spool valve. This is a simple on-off valve (3) controlled by an electrical solenoid (3b) and held closed by a spring (3a). When closed, fluid cannot move through the system except through the check valve. When the valve is open, fluid can flow freely in any direction. This is how you get the lap bars open at the end of the ride. In the station, the solenoid (3b) is energized, schematically pushing the valve spool (3) to the left against the spring (3a), and fluid can flow freely as indicated by the double arrow from the rod end of the cylinder back to the closed end, allowing the rod to extend and the bar to open. Better still, that fluid that was forced into the accumulator (4) can now come rushing out, effectively forcing fluid into the closed end of the cylinder (1), causing the lap bar (6) to open automatically. The fluid pressure provided by the rider pulling down on the lap bar (6) pressurized the accumulator (4); that pressure is released and works to push the bar (6) open. Remember that concept, because, as it turns out, that is how the whole ride works.
Hydraulic Launch
The same concept can be scaled up several thousand times to launch the Top Thrill Dragster train down the track at high speed. The whole system looks a bit like this:
Figure 2
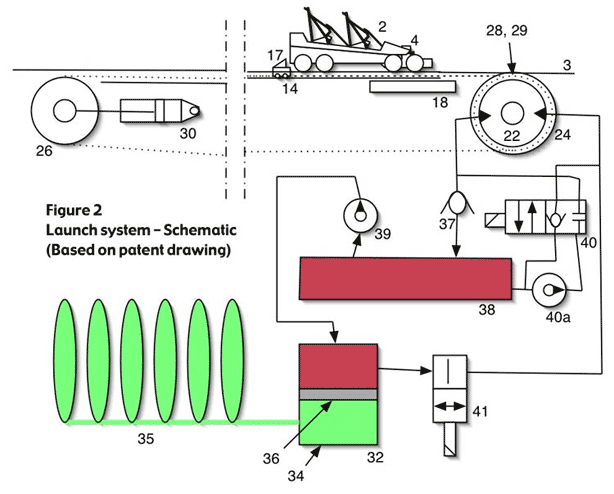
Figure 2 is, in fact, a slightly simplified version of Figure 5 from European patent #WO 166,210. Here you can see that the passenger train (2) supported by wheels (4) on a track (3) is propelled by a pusher assembly (17) mounted on a carrier (14). For the moment, let's focus on the hydraulics. It's really a simple system, remarkably similar to the lap bar assembly, only much bigger. The key is the cylinder (32) in the bottom center of the diagram.
To prepare the system for launch, the valve (41) is set into the closed position as shown. The fluid pump (39) pumps hydraulic oil (red) from the reservoir (38) into the cylinder (32). The cylinder (32) is a large hydraulic accumulator similar to the ones used on the lap bars. Except that while the lap bars are equipped with bladder accumulators containing essentially a Nitrogen filled balloon, this cylinder contains a piston (36). The chamber (34) at the bottom of the cylinder is filled with Nitrogen, but notice that in this case it is connected to a group of gas-filled bottles (35). As the cylinder (32) fills with oil, the piston (36) is forced back in the cylinder (32), compressing the Nitrogen gas (green) out of the chamber (34) and into the bottles (35).
Once the cylinder (32) is filled and the train (2) is in position, the system is ready to launch. This is accomplished by opening the valve (41) which allows the oil (red) to flow rapidly through the lines to a reversible hydraulic motor (22). The fluid flows rapidly because it is under pressure supplied by the gas charge (34) in the accumulator. The accumulator can release all the energy stored in it by the electric pump (39) very quickly, operating at a much higher volume than the electric pump (39) can produce. As the hydraulic motor (22) turns, the fluid is returned through the check-valve (37) to the reservoir (38). The hydraulic motor (22) is mounted coaxially with and attached to a cable winding drum (24). The launch cables (28, 29) pull the launch pusher (14) which shoves the train (2) down the launch track. Once the launch is completed, the valve (41) is closed to allow the accumulator (32) to recharge. Valve (40) is shifted to its schematically right-hand position to allow fluid (red) to flow as shown by the arrows, supplied by the pump (40a) or other means (pump (39) could be used as well). Notice that this reverses the fluid flow through the motor (22). This reverses the direction of the motor (22) to reset the launch carrier. The motor (22) is actually an assembly consisting of 32 hydraulic motors geared together to operate a common drive shaft. During the launch, the motors can be individually switched in and out of the hydraulic circuit to allow some control over the amount of energy that is transferred to the launch system.
The hydraulic circuit explained in more detail
During the launch cycle, fluid flows through valve (41), into the right-hand side of the motor (22), out the left-hand side of motor (22), through the check-valve (37) and back to the reservoir (38). The check-valve in the spool valve (40) will allow fluid to flow from the reservoir (38), through the check-valve (40), and into the right-hand side of the motor (22) in case the high-volume flow from the accumulator (32) pulls fluid through the valve (40). The blocked port in the valve (40) prevents return fluid from the motor (22) from running backward through the pump (40a). With the valve (41) closed and the valve (40) shifted, the pump (40a) supplies fluid to the left-hand side of the motor (22); that fluid then flows out of the right-hand side of the motor (22) and returns to the reservoir (38) through the valve (40). It isn't shown on my drawing, but the patent drawing indicates a spring to hold the check-valve (37) closed during the low-pressure reset operation, though the high-pressure launch will allow fluid to flow.
The Launch Hardware
It's great to have all this energy moving through the system. The hydraulics makes it possible to transfer a lot of energy very quickly, and that's part of what is needed to launch a train. The other part of the problem is to get that energy connected to the train so that it can be fired down the track at 100 MPH. Okay, for that we turn again to the artwork of Herr Spieldeiner, this time Figure 6 of the patent ...
Figure 3
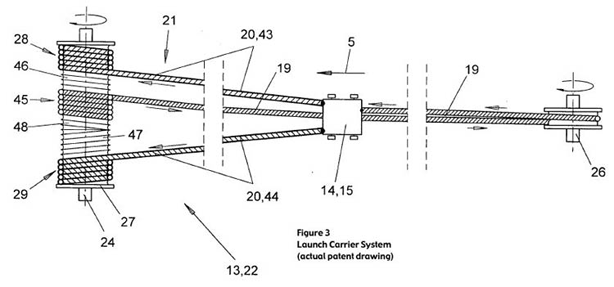
As is typical for patent drawings, the part numbers are consistent from figure to figure. Here, the train (2) is in position on the launch track (11). Behind the train is a pusher (14) which rides on its own set of rails in the center of the track (3). Referring to Figure 3, an overhead view of the train pusher, you can see that the pusher operates under the influence of wire rope! At the downtrack end of the launch is a cable winding drum (24). The drum is grooved with three different sets of guide grooves (46, 47, 48) and has three wire ropes (28, 29, 45) attached to it. Wire ropes (28) and (29) are attached to the front end of the train pusher (14). Wire rope (45) is attached to the back end of the train pusher, extends backwards along the launch track, passes around a pulley (26), returns under the launch track, and wraps around the winding drum (27). The direction of the wind for rope (45) is reversed from the wind of ropes (28) and (29). By attaching all of the ropes to the same winding drum, the mechanism is simplified, and the system can guarantee that everything moves at the same rate. When the launch cycle is initiated, the winding drum spins, drawing in ropes (28) and (29), pulling the pusher(14) along the track. Rope (45) is payed out from the winding drum. The patent is not clear on how the launch mechanism is stopped at the end of the launch. It could easily be stopped with a set of brakes on the winding drum, or by stopping the fluid flow through the motor, or by using a set of brakes (18) on the launch track. In fact, there is a magnetic brake caliper attached to the bottom of the train pusher (14) which is slowed in part by a set of brake fins at the end of the launch track. The tension on the cable is maintained by an adjusting mechanism (30) on the pulley (26).
Only two details remain. First of all, the train (2) is connected to the pusher (14) in such a way that the train (2) can disengage from the pusher (14) when the pusher (14) slows at the end of the launch track. That's simple enough; Figure 2 shows this quite clearly. The pusher (14) pushes against the back of the train (2) using a dog assembly (17) which, like a chain dog under most any coaster train will allow the train (2) to pass over it freely, but will catch the back end of the train (2). It doesn't hook on, it just pushes against the train (2). At the end of the launch track, the pusher (14) slows down and the train (2) keeps on going. Second, the hydraulic motor is reversed and the rope (45) is reeled in as ropes (28) and (29) are reeled out, causing the pusher (14) to return to the uptrack end of the launch track.
As built, the dog assembly (17) is a retractable pin on the underside of the train (2). At the launch staging area, an electrical solenoid lowers the pin (17) until it engages with a slot in the train pusher (14). The train (2) is allowed to roll backward until the pin (17) is firmly jammed into the slot in the train pusher (14). At the end of the launch, when the train (2) over-runs the train pusher (14), the pin (17) retracts into the underside of the train (2). That way, if the train (2) fails to clear the hill and rolls back, the pin (17) cannot re-engage with the train pusher (14), either bringing the train (2) to an unacceptably sudden stop, or causing damage to the train pusher (14) and the rest of the launch system (Figure 2).
The Safety System
Launched coasters present a special problem when it comes time to develop a safety system. With a traditional coaster with a lift hill, the lift hill is traversed at low speed, and can be equipped with an anti-rollback device to make certain that a train doesn't come backwards down the lift hill. The lift hill is also the highest point on the ride, so that if the train rolls backward, it won't have enough energy to make it to the top of the lift hill, so there is no danger of a train returning to the lift once it has cleared.
By comparison, a launched coaster may not have any hills tall enough to stall the train. When the train goes over its tallest hill, it may be going fast enough that it cannot be safely stopped using a traditional anti-rollback device, and in fact stopping the train may not be desirable. Top Thrill Dragster, for instance, is 420 feet tall. If the train fails to clear the top of the tower for any reason, it really isn't a good idea to stop it with an anti-rollback at the top of the hill. There is no mechanism there to advance the train further, and evacuating the train 420' in the air is something to be avoided if at all possible. But if the train makes it almost to the top and then rolls backward, it will be moving nearly 100 MPH when it gets to the bottom of the tower. Intamin's solution is to use their magnetic braking system on the launch track. This is a bit of a problem, though, because magnetic brakes on the launch would prevent the train from launching effectively. For this reason, there has to be a mechanism for engaging and disengaging the brakes on the launch track.
To do this, Intamin reversed the brake arrangement used on coasters such as Millennium Force, and returned to the configuration used on their drop towers. Permanent magnets are mounted on the bottom of the coaster train, and copper reaction fins are mounted on the track. The fins on the launch track are attached to actuating cylinders (either hydraulic or pneumatic; it isn't clear at this moment which) so that when the launch pusher reaches the end of the launch track, the brake fins are popped up into position. If the train fails to clear the tower, then, it will roll backward down the hill, and the brake fins on the launch track will bring the train to a stop.
This is very important because Top Thrill Dragster is designed to run six trains. This means that the trains will be very close together on the track. The basic rules of train blocking still apply, but the added complication of a launch track means that the first block doesn't end at the end of the launch track, but at the top of the hill. It is widely believed that the train blocking will be as follows:
Figure 4
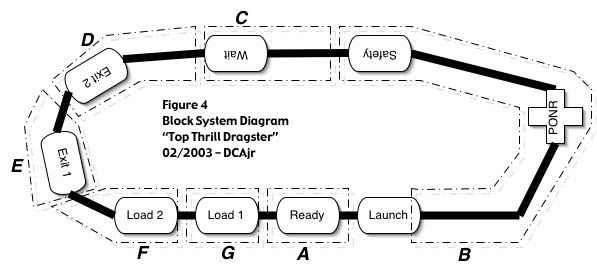
Block A: A staging area uptrack of the launch
Block B: The launch track, and the hill, until the entire train crests the top of the hill
Block C: The downhill side of the tower, through the station approach brake (with the checkered flags in the computer animation) to the end of a safety brake at the end of the ride
Block D: An unload station
Block E: A second unload station
Block F: A load station
Block G: A second load station
That's seven blocks, which is just enough to operate six trains.